Hey! By the way… TheEdibleTerrace is reader-supported. When you buy through links on our site, we may earn an affiliate commission and as an Amazon affiliate, we earn from qualifying purchases. Thanks in advance for your support!

Growing vegetables in a small space is totally achievable by embracing container gardening. It is a perfect, low maintenance way for you to grow your own food at home without the expense and upkeep of a full sized garden. If you are short on space or time, container vegetable gardening is the way to go!

You will find that many children who refuse to eat their vegetables will happily eat those you grow at home because they taste so much better. And, if you involve them by teaching your kids how to grow vegetables in pots you are blessing them with wonderful skills such as respect for nature, the consequences of actions (what happened because they did NOT water their carrots for a few days), and how to successfully complete projects.
[toc]
What Can You Grow In Container Vegetable Gardening Pots?
You can grow pretty much any type of vegetable in pots. It really depends on the size of the container you use. For plants with deeper roots such as potatoes or carrots, you will need deeper pots. A clever alternative for potatoes is to grow them in large plastic bags or a potato grow bag.
My favorite gardening book The Vegetable Gardener’s Container Bible from Edward C. Smith recommends a 12” deep x 12” wide pot for potatoes. I use a half whiskey barrel. This has worked out pretty well.
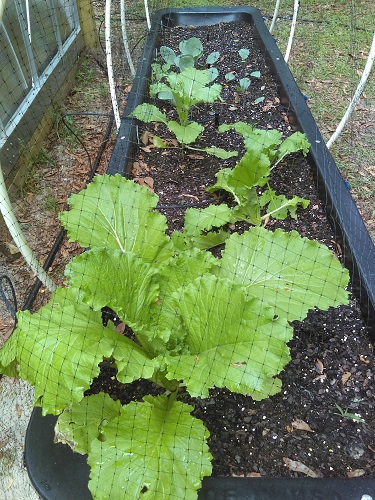
Shallow rooted plants such as lettuce greens, radishes, spring onions, and tomatoes are great container planting vegetables. Strawberries are also shallow rooted and make great container plants! We have grown our lettuce in anything from shallow, wide pots that are 17” wide x 7” deep to 10′ long watering troughs (pic below) to plastic gutters purchased at Home Depot and hung on lattice (vertical gardening anyone?!?). You can be quite creative here.

My thriving yellow potatoes!

We are using two 10′ feeding troughs from Tractor Supply as container gardens.
Tomatoes do extremely well in hanging baskets if you grow a tumbling variety such as the Tumbling Tom. These are ideal for people who are low on space. They are particularly beautiful when in bloom and can actually trail up to two feet from the container or basket they are grown in.
Full size tomatoes also grow well in containers but need the support of a trellis. They are somewhat tricky to raise so I recommend you do your research first before even buying the seedlings.
Winter and summer squash can even be grown in large containers but be warned they like to roam. For winter squash, I recommend you shop for the “short-vined” or “semi-bush” variety. Since summer squash is a bush rather than a vine it is less likely to take over the neighborhood.
If you want to grow any of the larger, heavier vegetables or fruit vertically (think growing cantaloupe or growing watermelon), consider putting them in a netting or hammock for support. They can become very heavy and break the vine of your plant which might kill it. You can get very creative here. Hold your squash up with a handkerchief or a piece of netting.
Another vegetable that grows well in pots is cucumbers. Consider growing them vertically as they are a vine. With a helping hand and a strong trellis, they will happily climb. If you decide not to use a trellis, assume your cukes will travel outside your container-no matter how large it is. The advantage to growing them vertically is they grow straighter and are easier to harvest.
There are a wide variety of beans, fruits and herbs that can be grown in your container garden. Some of the easiest to container grow are listed in this article.
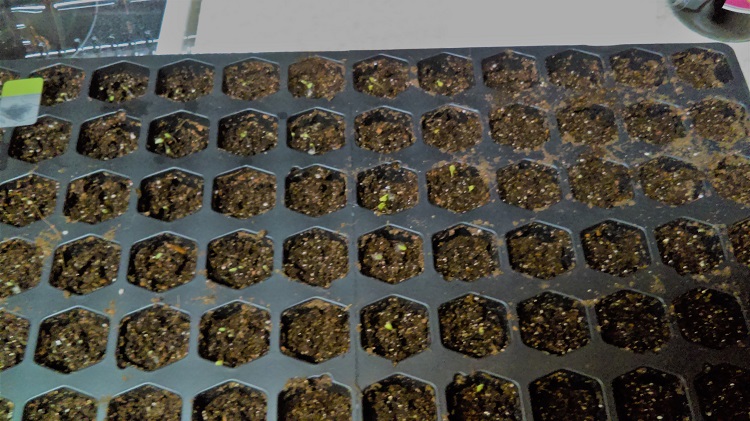
Get a jump on things by starting your seeds indoors. This can be done in the middle of winter or the dog days of summer.
The Best Soil for Your Vegetable Garden in Pots
Soil is THE most important consideration if you want a successful harvest. First, do you want to make your own or do you want to use store bought? Organic or not? Your budget has a little bit to do with this too.
My favorite author reminds us of the importance of having holey soil (not a typo!). Soil needs air pockets so the roots can easily grow. The more roots, the larger it gets, and the more it produces. Organic soil is alive. Those creatures need oxygen to live. Waterlogged soil is not good for them.
Store bought soil
When shopping, look for soil that is labeled container soil/mix or potting soil/mix. Sometimes it is called starting or transplanting mix. Do you want to spend a little extra money on organic? Highly recommend it! Before throwing it into your cart, take a look at the ingredients.
It is highly recommended that both sphagnum peat and perlite are added to soil. Perlite is crushed volcanic rock. It is what keeps your soil light and fluffy thus keeping oxygen flowing throughout your pot. A good soil will clearly have perlite throughout it. Since it looks like tiny pieces of popcorn, it is not too hard to miss.
Making your own potting soil
In order to grow organic vegetables in pots, Mr. Smith has a specific container soil recipe he recommends.
Ingredients
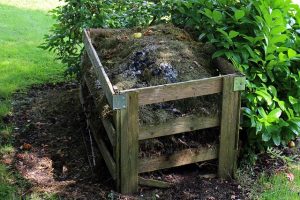
- One 20-quart bag of mature, high-quality compost (Make your own compost here!)
- One 20-quart bag of homemade or ready-made planting mixture with sphagnum peat, vermiculite or perlite, and limestone

Recommended organic fertilizer ingredients
- 1/3 cup blood meal (for nitrogen)
- 1/3 cup soft rock phosphate (for phosphorous)
- 1/3 cup greensand (for potassium and trace elements)
- 1 T azomite (for trace elements)
Directions
- Empty all ingredients (including fertilizer ingredients) into a wheelbarrow and mix together with a handheld cultivator.
- After the ingredients are combined, moisten the soil with a steady stream of water while continuing to stir.
- The finished soil should be moist but not soaked.
Choosing the right soil mix is very important if you want your plants to thrive, be healthy and produce a strong crop of delicious vegetables for you to enjoy.
Choosing the Right Containers
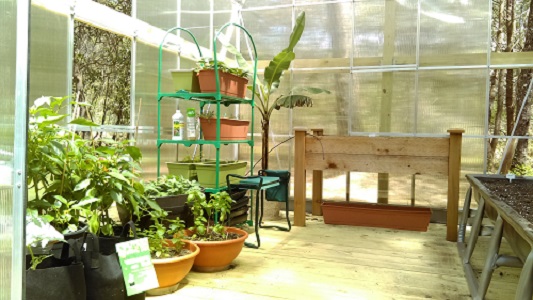
The Edible Terrace greenhouse in early spring 2017
You can use virtually any type of container you want. This may be a fun opportunity for you to be inventive and recycle old materials that would otherwise be discarded.
For example, one of our neighbors has created a garden in an old rowboat. Not only is it fun and creative but she has put to good use an item that would otherwise end up at the landfill or bottom of the ocean.
Take note that a container needs good drainage. It is absolutely vital that you ensure excess water can drain out or your plants will suffer. Assuming the material can withstand it, if necessary drill more drainage holes. (We have bought many cute inexpensive pots over the years and drilled holes in the bottom-including my feed troughs.)
As you can see in my greenhouse picture above, I am using several types of pots in our garden. On the right is my 10′ feed trough we bought from Tractor Supply (Boy, do I love TS!). We actually have two. I have the other on the outside of the greenhouse. In the back is a Gronomics raised garden bed. On the left are several assorted containers from 5-gallon grow bags, to a half whiskey barrel for my potatoes to rectangular planting boxes on my mini greenhouse. The terra cotta round pots on the floor were recycles from our neighbor. She was going to throw them away. HOLD UP!
Mr. Smith is completely sold on self-watering containers. They are great for those days when maybe, just maybe, we do not get outside to water as quickly as we should…
The main benefit he lists is that there is a consistent level of moisture available for the plant-from the bottom up-which means the roots always have access to water.
Clay and containers made from similar porous materials will dry out much quicker than metal or plastic containers. If you live someplace where it freezes, clay containers will start to break after a few years as the moisture gets into the pores and freezes.

You can make your own containers out of wood or you can reuse materials that would otherwise be thrown away. This latter method is by far the most economical way for you to get your container garden up and running. Ask around. You may be able to find suitable containers that people will give you for free!
Old tires can be painted vivid colors and arranged into gorgeous planters; old gutters can be affixed to a wall and used to grow shallow rooted plants; large tin cans make for excellent wall mounted planters and even plastic milk bottles can be cut in half and mounted on a fence to grow vegetables.
You are only limited by your imagination here. There is so much you can do to make an interesting container garden using the space that is available to you. Keep in mind if you are mounting containers on walls or fences, they need to be strong enough to support the container and soil. Same goes for choosing suitably strong containers that will hold your soil mix.
How Do You Water A Container Garden?
Irrigation System installed on the outside garden container
Watering your garden is vital if you want your plants to survive, so it is important that you think about access to your containers and how far they are from a water source. If too far, then you may lose your enthusiasm and not water your plants.
I started out by watering with our garden hose every morning-and sometimes, when the day was particularly warm, sprinkling lightly again in the evening. This worked but my plants grew quite slowly. Then, before we went on our 5-week tour around the states in Summer 2017 (pics posted soon), we put in an irrigation system. My greenhouse was OUT OF CONTROL when I got home! Sheesh. Guess I had not been not watering enough.
Your plants will need watering whenever they become dry and you can check this by pushing your finger in to the soil up to the second knuckle. If it feels dry at your finger tip, then it needs watering. If it feels wet then do not water it. Since I am pretty lousy at this technique, I use a moisture sensor. My life now revolves around it. Seriously.
Do not think that just because it rains your containers don’t need watering. The limited soil area of a container and your plants can get in the way of the rainwater making it into the soil. So, even on rainy days check that water!
I have read many articles on when it is the best time to water. Based on my own experimentation (in the hot FL sun-Zone 8b), it was best for my plants to be watered fully in the morning. I have read a good watering session in the morning makes it easier for them to combat the sun’s heat. It is a myth that watering in the morning on a hot day will scorch the plants. If mornings are not possible, then do it when you can. Oh, I had also noticed when I was experimenting that my seeds would do really well if I soaked their area at night. They seemed to sprout quickly when I did that.
If you do water later in the day, make sure you give enough time between watering and nightfall as damp leaves can cause fungus problems. Powdery mildew or sooty mold can form harming your vegetables. I had problems with this.
Check your plants daily to see if they need water during the growing season. Also, keep an eye out for diseases or pests.
How to Choose the Best Fertilizer for Your Vegetable Garden?
If you used the soil mix that was mentioned earlier in this report then you will not need to fertilize your containers at all the first year.
If not, or if your soil is over a year old, then you may need to start fertilizing when roots begin to fill the pot or the fruit appears. In all cases, I do recommend organic fertilizer.
If you are replacing fertilizer for a lot of soil, use Mr Smith’s fertilizer recipe from above. For convenience, here it is again.
Recommended organic fertilizer ingredients
- 1/3 cup blood meal (for nitrogen)
- 1/3 cup soft rock phosphate (for phosphorous)
- 1/3 cup greensand (for potassium and trace elements)
Directions
- In a wheelbarrow, stir the ingredients into 40 quarts of soil.
- After the ingredients are combined, moisten the soil with a steady stream of water while continuing to stir.
- The finished soil should be moist but not soaked.
A liquid fertilizer is recommended if your vegetables start to look droopy or unhealthy. The benefit to a liquid fertilizer is it is fast acting. There are recipes for DIY fertilizers (animal or plant based) or you can buy it from the store. Follow the directions on the purchased fertilizer for how best to use it with your plants.
Take note certain plants require an emphasis on certain nutrients (or cannot have too much of a specific nutrient). For example, if you use a fertilizer high in nitrogen with tomato plants then they may produce more leaves than fruit. My apple banana plant needs extra potassium if I actually want it to grow bananas for me.
Fertilizing plants properly is quite a delicate process. Do your research first before feeding any of your vegetables.
Tips on Natural Garden Pest Control

Aphids on my bell peppers
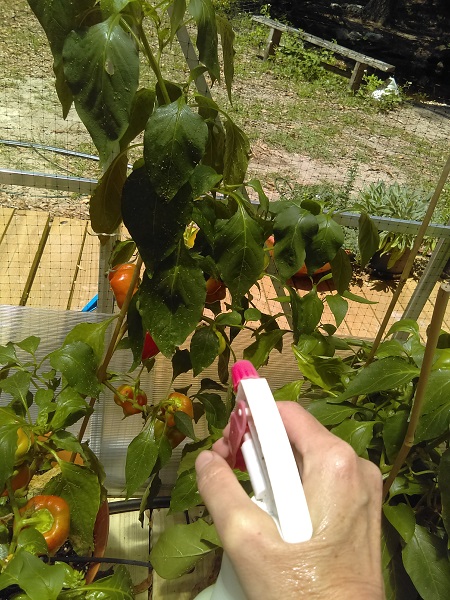
Spraying the Aphids with a DIY insecticidal soap.
Pests are a big problem for any gardener and hopefully you can avoid many of the problems that come from growing directly in soil. When you water your plants, always give them a quick visual inspection and check for pests and other problems.

You could be proactive by using hot pepper wax or garlic spray which makes the plant distasteful to the bugs thus driving them away. However, these really only work if you spray the leaves before they appear.
I have used a DIY insecticidal soap that worked great. Try to find a spray bottle with a nozzle that turns up. This will make your task much easier. Additionally, we have cut entire stems off our plants because the aphids had taken over. If you do this, don’t throw that stem into your compost without getting rid of the pests first!
Other pests such as Georgia Thumpers (a major problem in our area), Cabbage Worms and Flea Beatles can be kept away by using row covers over your plants. This is the least harmful method. In regards to the Cabbage Worms, it prevents you having to pull their squishy little bodies off your plants one by one! I put deer netting up e.v.er.y.w.h.e.r.e.
Flea Beatles love to hang out in leaf piles, weedy areas, etc. so if you make a point of keeping your containers away from these areas in your yard-and elevating the containers a couple feet off the ground, they tend to stay away. Elevating your containers can prevent snails and slugs from chewing on your plants as well.
Those are not the only pests though so keep an eye out for any problems, holes, discoloration, etc. on your vegetables. If you do spot anything, then look into it carefully and see what is causing the issue. It is better to take action sooner rather than later as you are more likely to save your crop.
Understanding Diseases in Container Vegetable Gardens
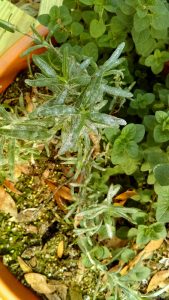
Rosemary with Powdery Fungus
Diseases tend to be less of a problem in containers because you are using a commercial or homemade soil. Many of the common plant diseases are found in garden soil and by not growing in the ground you are avoiding these problems.
Other plant diseases are air born and you can find diseases such as potato or tomato blight affecting your plants where it has blown in. You will notice this by the leaves and stems starting to turn brown and curl up. If this happens, you need to treat immediately in order to prevent it from taking hold and killing your plants.
If it is late enough in the season, then you can cut the foliage off potatoes and the potatoes themselves will be okay under the ground. You can remove fruit from tomato plants and ripen them on a windowsill. Watch out though, the fruit may still be affected.
Fungal diseases can be introduced if there is not sufficient air circulation around your plants or you water the leaves of the plant too late in the day. These problems can mostly be avoided by ensuring that air can circulate around your plants and prevent moisture gathering.
For the most part, thanks to gardening in containers you will not have problems with diseases but do not let that make you complacent. Check your plants regularly!
Conclusion
Growing vegetables in a small place by embracing container gardening is a great way to begin growing your own vegetables at home. It does not require a lot of time or space and avoids many of the problems (and much of the hard work) involved with growing directly in the ground. For anyone who has limited space or just wants grow a few herbs, fruits or vegetables at home this is an ideal way to get started.
Are you considering using a large container for your small space garden? Then the square foot gardening method is highly recommended for planting your crops as it makes the most efficient use of the space you have.
Would you like to know how to grow a Hydroponic Garden? Check that out here.
